Chipolo in HomeAssistant
27 Nov 2023Chipolo One als Device in HomeAssistant.
-
Identifiziere Dein Chipolo Device zuerst mit dem bluetoothctl Befehl
Enable bluetooth le scansbluetooth scan le AdvertisementMonitor path registered -
Zeige alle sichtbaren Geräte
bluetoothctl devices Device C2:37:C2:5E:07:05 C2-37-C2-5E-07-05 Device C6:C1:F1:4B:1F:D2 C6-C1-F1-4B-1F-D2 Device EE:90:B9:BC:E6:0F Saphe Drive Mini Device D9:00:00:08:7C:4B D9-00-00-08-7C-4B Device FD:8E:37:6A:31:CC FD-8E-37-6A-31-CC Device F1:70:BE:0F:F6:E7 Mi Smart Band 5 -
Zeige die Informationen zu jedem Gerät welches gefunden wurde.
Als UUID wird etwas mit "CHIPOLO" angezeigt. Teste ob es sich um Dein Chipolo Gerät handelt und schalte es aus und scanne erneut. Es sollte nicht wieder auftauchen oder abfragbar sein. Schalte es wieder ein und es sollte wie gewohnt funktionieren.bluetoothctl info D9:00:00:08:7C:4B Device D9:00:00:08:7C:4B (random) Alias: D9-00-00-08-7C-4B Paired: no Trusted: no Blocked: no Connected: no LegacyPairing: no UUID: CHIPOLO d.o.o. (0000fe65-0000-1000-8000-00805f9b34fb) UUID: CHIPOLO d.o.o. (0000fe33-0000-1000-8000-00805f9b34fb) ManufacturerData Key: 0x004c ManufacturerData Value: 02 15 0f 73 d4 53 75 24 48 62 a8 64 34 20 87 5d ...s.Su$Hb.d4 .] ba 4b 00 08 7c 4b c5 .K..|K. ServiceData Key: 0000fe33-0000-1000-8000-00805f9b34fb ServiceData Value: 01 00 01 00 d9 00 00 08 7c 4b ........|K RSSI: -90 -
Konfiguriere HomeAssistant
Benutze die Integration bluetooth_le_tracker module in der configuration.yamldevice_tracker: - platform: bluetooth_le_tracker track_new_devices: true track_battery: true
-
Einmal gestartet, legt es eine Datei known_devices.yaml an. Du solltest "track_new_devices" deaktivieren und zu "false" setzen, andernfalls wird die Datei known_devices.yaml zugemüllt mit allen Geräte die auch nur kurz vorbei fliegen. Hängt natürlich davon ab, wo Du wohnst.
-
Trage nur Deine Geräte in die known_devices.yaml ein
d9_00_00_08_7c_4b: # name: D9-00-00-08-7C-4B name: Fahrrad Verena mac: BLE_D9:00:00:08:7C:4B icon: mdi:bicycle picture: track: true d8_01_00_01_a0_ec: # name: D8-01-00-01-A0-EC name: Fahrrad Gerald mac: BLE_D8:01:00:01:A0:EC icon: mdi:bicycle picture: track: true -
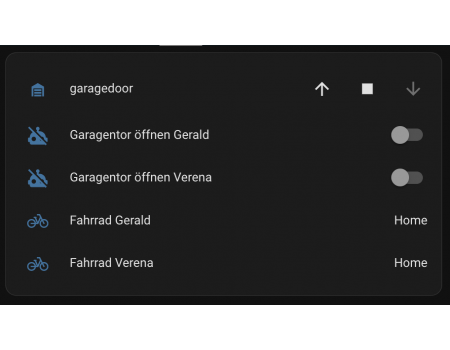
Jetzt kannst Du es in HomeAssistant benutzen. Ich verwende es um die Anwesenheit der Fahrräder meiner Frau und mir in der Garage zu tracken

type: entities entities: - entity: cover.garagedoor - entity: automation.garagentor_offnen_gerald - entity: automation.garagentor_offnen_verena - entity: device_tracker.d8_01_00_01_a0_ec - entity: device_tracker.d9_00_00_08_7c_4b show_header_toggle: false -
Und damit eine Automation erstellt welche das Garagentor automatisch öffnet wenn ich und mein Fahrrad abwesend waren. Die erste Automation prüft nur die Konditionen und aktiviert eine zweite Automation, welche das Garagentor öffnet sobald ich die Home Zone betrete. Ich gehe davon aus, das wenn ich mit dem Fahrrad weg bin - komme ich auch mit dem Fahrrad wieder und möchte es gleich in die Garage stellen.
alias: Garagentor öffnen aktivieren Gerald
description: ""
trigger:
  - platform: state
    entity_id:
      - device_tracker.d8_01_00_01_a0_ec
    to: not_home
    for:
      hours: 0
      minutes: 5
      seconds: 0
  - platform: state
    entity_id:
      - person.gerald
    to: not_home
    for:
      hours: 0
      minutes: 5
      seconds: 0
condition:
  - condition: state
    entity_id: device_tracker.d8_01_00_01_a0_ec
    state: not_home
    for:
      hours: 0
      minutes: 4
      seconds: 59
  - condition: state
    entity_id: person.gerald
    for:
      hours: 0
      minutes: 4
      seconds: 59
    state: not_home
action:
  - service: automation.turn_on
    data: {}
    target:
      entity_id: automation.garagentor_offnen_gerald
mode: single
Die zweite Automation öffnet nur das Garagentor und deaktiviert sich wieder.
alias: Garagentor öffnen Gerald
description: ""
trigger:
  - platform: zone
    entity_id: person.gerald
    zone: zone.home
    event: enter
condition: []
action:
  - service: cover.open_cover
    data: {}
    target:
      entity_id: cover.garagedoor
  - service: automation.turn_off
    data:
      stop_actions: true
    target:
      entity_id: automation.garagentor_offnen_gerald
mode: single
Die Deaktivierung war nötig um das Garagentor ausversehen zu öffnen. Da die Anwesenheitserkennung manchmal hakelig ist.